Self-Test for Monitoring Activation
Prefer to Self-Test?
This option is for customers who prefer to complete the alarm monitoring system test on their own schedule instead of coordinating a live session with a monitoring agent. Once you’ve completed the steps and submitted the form, our team will review the signals sent from each sensor (including the SOS buttons) to ensure your system is functioning correctly.
What You'll Do:
1. Prepare your system for testing.
2. Test all sensors (entry, motion, and SOS).
3. Restore your settings.
4. Submit the form to confirm test completion.
Self-Test Instructions
Take note of the time you begin your test
Write down the exact time you begin the test. You'll need it later for the form.

Pre-Test Setup: Siren & Delay Configuration
Let's turn off the siren sounds to avoid loud alerts during testing — no one wants a blaring alarm every time a sensor is triggered. Entry and exit delays are also set to ensure smooth and accurate sensor testing.
Prepare the Alarm Panel via Smart Life App (these settings can also be made directly from the panel itself)
1. Open the Smart Life app, select your device and go to settings.
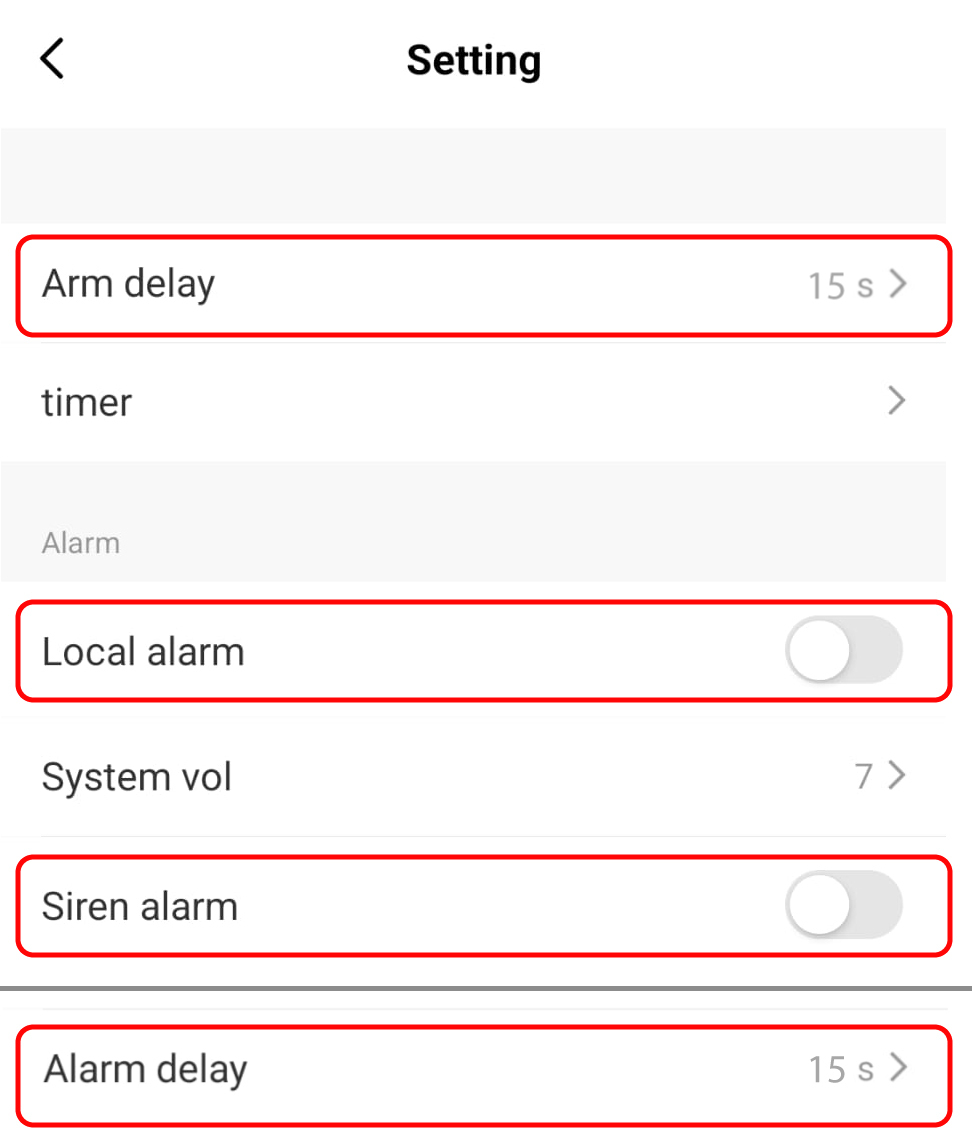
2. Silence the sirens:
- Disable Local Alarm (panel siren)
- Disable Siren Alarm (external siren)
3. Set the delays:
- Arm Delay: 15 seconds
- Alarm Delay: 15 seconds
Test Entry & Motion Sensors
We are now going to perform a full test to ensure that intrusion sensors of the system are communicating with the Monitoring Station This includes both Entry Sensors and Motion Sensors.
Motion Sensor: Prevent False Triggers:
If two motion sensors are positioned close to one another, it's recommended to temporarily disable one during the test. This prevents accidental activation of the wrong sensor and helps ensure accurate results.
Note:
• It’s recommended to test from the Gen 2 Alarm Panel display. If you have a larger home, consider getting help or carrying the panel with you.
• A green light will appear next to the cellular signal bars on the screen. This indicates that a signal is successfully sent from the alarm panel to the monitoring station.
(IIlustrations correspond with the numbered steps for easy reference)
Test Entry Sensors (Doors/Windows)
1. Arm the system by selecting 'Home'. This will prevent the
motion sensors from triggering. Look out for a green light to briefly appear near the cellular signal bars — it will only remain visible for a few seconds(sometimes longer).
2. Confirm that the green light briefly appeared near the cell bars.
3. Wait another 15 seconds or until the green light disappears.
4. Open the door/window with the entry sensor to trigger the alarm.
5. Wait for the Alarm Delay to count down (15 sec)—alarm will then trigger.
6. “Alarm Entry Alarm: [Sensor Name]” will appear on the panel. A green light near the signal
bars will flash briefly.
7. Confirm that the green light briefly appeared near the cell bars.
8. Wait another 15 seconds or until the green light disappears.
9. Press Disarm and enter your code. Look out for a green light to briefly appear near the cellular
signal bars — it will only remain visible for a few seconds (sometimes longer).
10. Confirm that the green light briefly appeared near the cell bars
11. When the green light disappears, repeat steps for remaining Entry Sensors.
Entry Sensor test Complete
Test Motion Sensors
1. Arm the system by selecting 'Away'. Look out for a green light to briefly appear near the cellular signal bars — it will only remain visible for a few seconds (sometimes longer)..
2. Confirm that the green light briefly appeared near the cell bars.
3. Wait for the Arm Delay to count down (15 sec).
4. Wait another 15 seconds or until the green light disappears
5. Walk in front of the motion sensor to trigger the alarm.
6. Wait for the Alarm Delay to count down (15 sec)—alarm will then trigger.
7. “Alarm Motion Alarm: [Sensor Name]” will appear on the panel. A green light near the signal bars will flash briefly.
8. Confirm that the green light briefly appeared near the cell bars.
9. Wait another 15 seconds or until the green light disappears.
10. Press Disarm and enter your code. Look out for a green light to briefly appear near the cellular signal bars — it will only remain visible for a few seconds (sometimes longer).
11. Confirm that the green light briefly appeared near the cell bars.
12. Wait another 15 seconds or until the green light disappears.
13. Repeat steps for remaining Moton Sensors
Motion Sensor test Complete
Test SOS Buttons
We are now going to perform a full test to ensure that all SOS buttons are communicating with the Monitoring Station. This includes each emergency category including: Medical, Fire, Police, and Police (Silent).
(IIlustrations correspond with the numbered steps for easy reference)
Medical:
1. Tap the SOS button.
2. Select Medical. Look out for a green light to briefly appear near the cellular signal bars — it will only remain visible for a few seconds, (sometimes longer).
3. Confirm that the green light briefly appeared near the cell bars.
4. Look for “Alarm Medical SOS: Host panel” displayed on the alarm panel.
5. Wait another 15 seconds or until the green light disappears.
6. Disarm and enter your code. Look out for a green light to briefly appear near the cellular signal bars — it will only remain visible for a few seconds (sometimes longer).
7. Confirm that the green light briefly appeared near the cell bars.
8. Wait another 15 seconds seconds or until the green light disappears.
SOS Medical Test Complete
Fire:
1. Tap the SOS button.
2. Select Fire. Look out for a green light to briefly appear near the cellular signal bars — it will only remain visible for a few seconds (sometimes longer).
3. Confirm that the green light briefly appeared near the cell bars.
4. Look for “Alarm Fire SOS: Host panel” displayed on the alarm panel.
5. Wait another 15 seconds or until the green light disappears.
6. Disarm and enter your code. Look out for a green light to briefly appear near the cellular signal bars — it will only remain visible for a few seconds (sometimes longer).
7. Confirm that the green light briefly appeared near the cell bars.
8. Wait another 15 seconds seconds or until the green light disappears.
SOS Fire Test Complete
Police️:
1. Tap the SOS button.
2. Select Police. Look out for a green light to briefly appear near the cellular signal bars — it will only remain visible for a few seconds (sometimes longer).
3. Confirm that the green light briefly appeared near the cell bars.
4. Look for “Alarm Police SOS: Host panel” displayed on the alarm panel.
5. Wait another 15 seconds or until the green light disappears.
6. Disarm and enter your code. Look out for a green light to briefly appear near the cellular signal bars — it will only remain visible for a few seconds (sometimes longer).
7. Confirm that the green light briefly appeared near the cell bars.
8. Wait another 15 seconds seconds or until the green light disappears.
SOS Police Test Complete
Police (Silent)️:
1. Tap SOS button
2. Select Police (Silent). Look out for a green light to briefly appear near the cellular signal bars — it will only remain visible for a few seconds.
3. Confirm that the green light briefly appeared near the cell bars.
4. No alarm message will appear.
5. Wait another 15 seconds or until the green light disappears.
6. Disarm the alarm from the Smart Life App.
SOS Police (Silent) Test Complete
Note the End Time
Record the time you completed testing for the form.

Post-Test Reset: Siren & Delay Restoration
We’re now re-enabling the siren sounds, along with restoring all entry and exit delays to their original settings.
Re-enable the alarm sounds
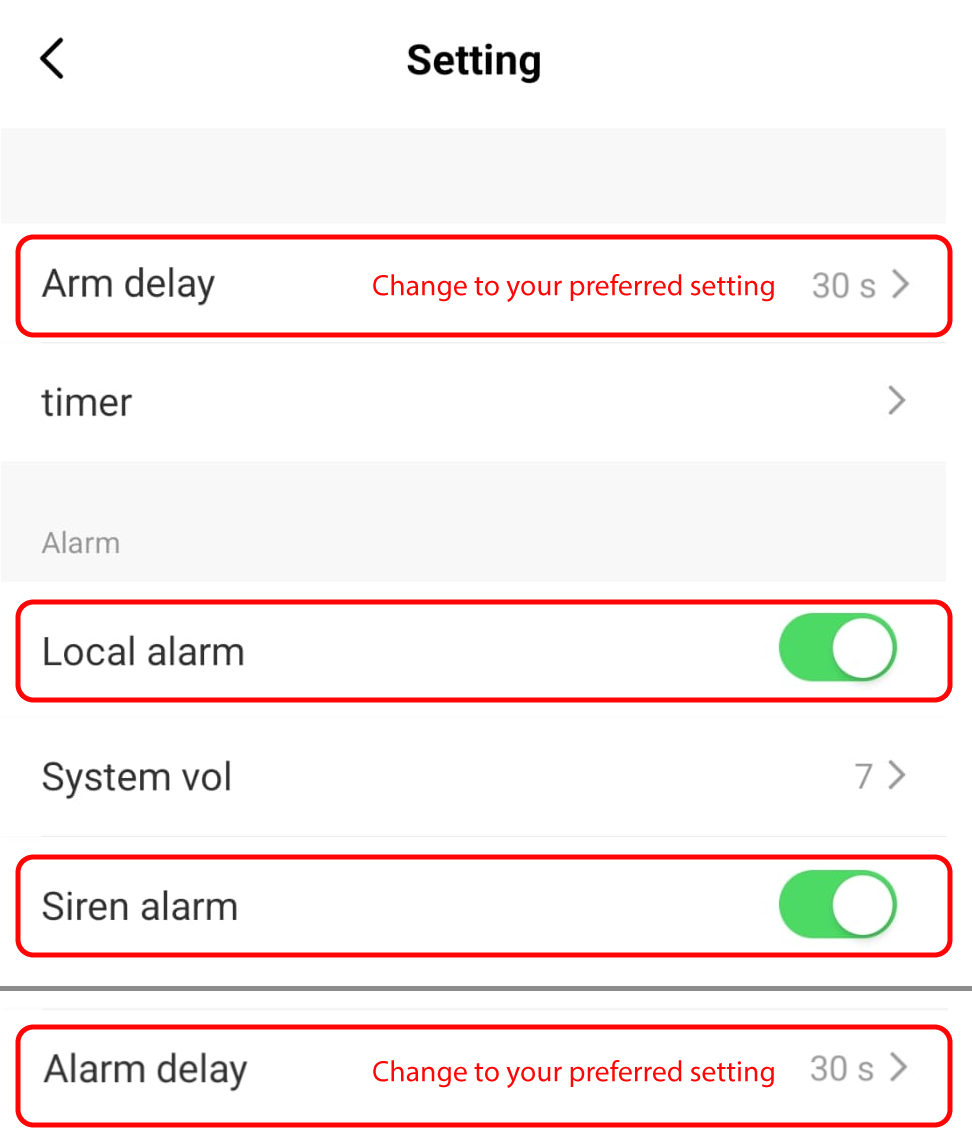
1. In the Smart Life app, re-enable:
- Local Alarm (panel siren)
- Siren Alarm (external siren)
2. Set the delays:
- Arm Delay: To you preferred setting
- Alarm Delay: To you preferred setting
Final Step: Complete the Self-Test Section
Now that the test is complete, please return to the test request form and fill out the self-test area to confirm the date, start and end time
Submit the Test Request Form
1. Go back to the Test Request Form
2. Select 'Self-Test Completed' and enter the date, start time, and end time of your test.
